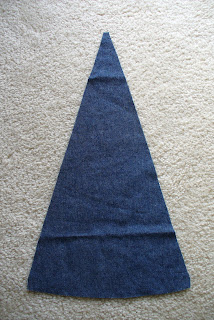
Certainly there must be one poor seamstress out there desperately Googling "how to sew in skirt gussets" (after all, that would have been me yesterday), and this tutorial is for you.
I admit it, I am a rebel at heart, which is the reason why I desperately needed a Saviour. I still have trouble with this congenital drive to do a thing my OWN way, and sometimes at the most inconvenient times -- in this case, sewing. I can NEVER just follow the instructions and leave a sewing pattern alone. I have to either lengthen it, add a frill that wasn't in the pattern, alter the neckline, or use some sort of fabric other than what the pattern company suggests for that particular design.
In this case I was making a skirt for Amy. I used a pattern that calls for something lightweight, like linen or rayon, and I had to use denim. So I made it a size bigger just in case thicker fabric in eight seams messed up the size calculations. I lengthened it 3", because she likes her skirts really long. And I did NOT follow the instructions for the gussets! The last time I made this skirt it was for Betz. The gussets were a huge headache. I needed a fix. And for once, striking out on my own resulted in success!
Here's the pattern I used. It's lovely! I made view B, the green one, for my 6'2" daughter. It has eight gores with gussets at the bottom to make it fuller at the hem. I love the way this skirt appears to hang in the picture. It's feminine and modest and pretty.
Kwik Sew only allows 1/4" for seams. That does not allow much room for error! And, even if you had the usual 5/8" seams, cutting 1/8" wider, or making a 1/8" error sewing each piece of an eight-gore skirt will make it up to 2" bigger or smaller than you planned on. So cut carefully. And, be sure to mark the dots accurately where the side seams and gussets match up!
The instructions for this pattern tell you to first sew one triangular gusset to each rectangular skirt piece (there are eight of each), then to sew each of those pieces together. It should have worked, after all, it sounds simple enough. But it wasn't. I ended up with bubbles at the tips of the gussets and stretched pieces that ended up not fitting together right.
The instructions for this pattern tell you to first sew one triangular gusset to each rectangular skirt piece (there are eight of each), then to sew each of those pieces together. It should have worked, after all, it sounds simple enough. But it wasn't. I ended up with bubbles at the tips of the gussets and stretched pieces that ended up not fitting together right.
Here's a gusset. At the point I should have photo-shopped the dot in. It's 1/4" from each side seam, at the point, but here you can't see it.
Rather than following the pattern instructions, I sewed two side panels together from the top to the dot, and reinforced at the dot with a back-stitch. The gusset goes here, between these two long pieces:
Working with the gusset on the underside, pin it right sides together to one of the rectangular pieces.
Boy, this isn't easy to see ...but sew the gusset to the side panel with gusset on the underside, starting with a backstitch right at the dot where you ended the previous stitching (two photos up). The side panel that is NOT being sewn should be folded back out of the way. Feel with your fingers for the fold. The dot should be right at the fold. This view is the underside of what you are sewing.
 |
| Match the dots up! |
Now, holding the point of the gusset, turn it to line up with the edge of the other side panel. Open out the seam of the side panels to keep the top one out of the way, and beginning right at the dot, sew the gusset to the remaining side panel.
Here's how your seam looks now (below). Clip one side seam just above the gusset piece.
And voila! A perfectly smooth point. Now repeat this whole process seven times. If your fabric is ravelly you will want to finish the seams. A zig-zag is good, or you can overlock. Then press your side seams all in one direction, and press the gusset seams flat. Finish the skirt as directed, like a good girl.
For Amy I top-stitched everything for a store-bought look. She is very happy with the outcome, but next time I will move the dots up 3" and alter the gusset to be 3" taller, while keeping the same width across the bottom. That will give her more width at the knees for activity.
Here's my sweet Amy in the finished product:
She seeketh wool, and flax [and denim], and worketh willingly with her hands.
Proverbs 31:13


Oh, Sally! I sent this to my mom via email, as she is going to make Grace a skirt. Grace wants one just like this. They are going to get the fabric and look for a pattern tomorrow.
ReplyDeleteThat is so pretty! (Embarassingly... I didn't even now what a gusset WAS, much less how to sew one...now I know both thanks to you!) :-)
ReplyDeleteI am so glad you shared this!! I just made a skirt for Ellie with gussetts and it turned out so bad :( I had to throw it away. I am definatly going to remember this if I attempt that pattern again. And BTW Amy is beautiful!!
ReplyDelete