Welcome to Diamonds in the Rough, the inconsistent scribblings of a preacher's wife, mom, and city girl happily out of her element. If you are a first-time guest here, please read "Why Diamonds?"
Lots of sewing has been going on here lately, and this is one area where I do know what I am doing. Most of the time. Enough that I could be a help to someone who doesn't know what they are doing. I have a few tips to share with beginning seamstresses, and there is a slight possibility of me starting a sewing blog... but not tonight!
We grown ladies don't want to ever need the larger sizes when we are sewing for ourselves, but if you are sewing for a child, you probably want to be able to reuse your pattern when the child has grown. A jacket for Betz is in the works, and she is a size 14 girls. This pattern goes up to size 16, and I don't want to just cut those size 16 lines off and throw them away. If this dress and jacket combo turns out nicely, I might want to make it again sometime. This tutorial is on how to cut the smaller size of a pattern out without losing the larger sizes.
When you are cutting out a straight seam, just fold back the pattern tissue to the right size, like so:
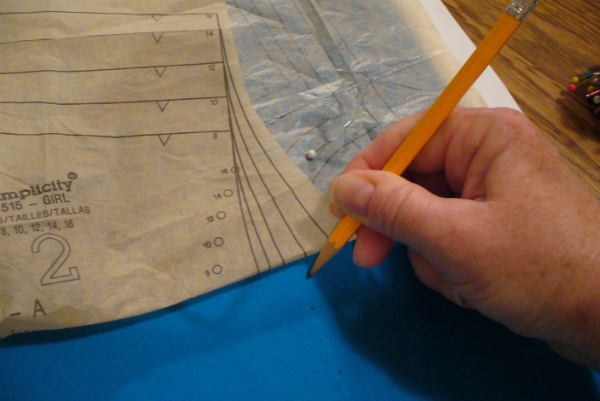
But for curves such as sleeves and necklines, that doesn't work. Instead, do this. Using a pencil or a water-soluble marker, dot on your fabric the cutting line you need, under the pattern piece. Start at one end of the curve and fold the pattern piece back a bit at a time, making a dot every inch or so where the cutting line meets the fold of tissue. Like so:
You may have to continue from the other end of the cutting line when you get to the deepest part of the curve:
When you finish, cut on the dotted lines. Your cut piece is now the right size, and you can save that same pattern for a few months down the road, when your darling child has grown to the next size.
You can see I used only four pins here. Don't go pin crazy. The more you put in to begin with, the more you will have to remove while you are marking!
This transfer method also works well to mark darts, button holes, button placement, notches, and small/large pattern construction dots. You will want to do that before you remove the pattern piece. Water-soluble marker (found in the notions section) is great, especially if the person you made the garment for is extremely anxious to wear it. :) But because marker may become difficult to remove if you accidentally iron over it, I prefer to use pencil.
Happy sewing!
She seeketh wool, and flax, and worketh willingly with her hands.
Certainly there must be one poor seamstress out there desperately Googling "how to sew in skirt gussets" (after all, that would have been me yesterday), and this tutorial is for you.
I admit it, I am a rebel at heart, which is the reason why I desperately needed a Saviour. I still have trouble with this congenital drive to do a thing my OWN way, and sometimes at the most inconvenient times -- in this case, sewing. I can NEVER just follow the instructions and leave a sewing pattern alone. I have to either lengthen it, add a frill that wasn't in the pattern, alter the neckline, or use some sort of fabric other than what the pattern company suggests for that particular design.
In this case I was making a skirt for Amy. I used a pattern that calls for something lightweight, like linen or rayon, and I had to use denim. So I made it a size bigger just in case thicker fabric in eight seams messed up the size calculations. I lengthened it 3", because she likes her skirts really long. And I did NOT follow the instructions for the gussets! The last time I made this skirt it was for Betz. The gussets were a huge headache. I needed a fix. And for once, striking out on my own resulted in success!
Here's the pattern I used. It's lovely! I made view B, the green one, for my 6'2" daughter. It has eight gores with gussets at the bottom to make it fuller at the hem. I love the way this skirt appears to hang in the picture. It's feminine and modest and pretty.
Kwik Sew only allows 1/4" for seams. That does not allow much room for error! And, even if you had the usual 5/8" seams, cutting 1/8" wider, or making a 1/8" error sewing each piece of an eight-gore skirt will make it up to 2" bigger or smaller than you planned on. So cut carefully. And, be sure to mark the dots accurately where the side seams and gussets match up!
The instructions for this pattern tell you to first sew one triangular gusset to each rectangular skirt piece (there are eight of each), then to sew each of those pieces together. It should have worked, after all, it sounds simple enough. But it wasn't. I ended up with bubbles at the tips of the gussets and stretched pieces that ended up not fitting together right.
Here's a gusset. At the point I should have photo-shopped the dot in. It's 1/4" from each side seam, at the point, but here you can't see it.
Rather than following the pattern instructions, I sewed two side panels together from the top to the dot, and reinforced at the dot with a back-stitch. The gusset goes here, between these two long pieces:
Working with the gusset on the underside, pin it right sides together to one of the rectangular pieces.
Boy, this isn't easy to see ...but sew the gusset to the side panel with gusset on the underside, starting with a backstitch right at the dot where you ended the previous stitching (two photos up). The side panel that is NOT being sewn should be folded back out of the way. Feel with your fingers for the fold. The dot should be right at the fold. This view is the underside of what you are sewing.
Match the dots up!
Now, holding the point of the gusset, turn it to line up with the edge of the other side panel. Open out the seam of the side panels to keep the top one out of the way, and beginning right at the dot, sew the gusset to the remaining side panel.
Here's how your seam looks now (below). Clip one side seam just above the gusset piece.
And voila! A perfectly smooth point. Now repeat this whole process seven times. If your fabric is ravelly you will want to finish the seams. A zig-zag is good, or you can overlock. Then press your side seams all in one direction, and press the gusset seams flat. Finish the skirt as directed, like a good girl.
For Amy I top-stitched everything for a store-bought look. She is very happy with the outcome, but next time I will move the dots up 3" and alter the gusset to be 3" taller, while keeping the same width across the bottom. That will give her more width at the knees for activity.
Here's my sweet Amy in the finished product:
This is a RARE photo of Amy. She is usually behind the camera, not in front of it. But she has clicked her new shutter at me so many times in the past few days, that she admittedly owed me this. :)
She seeketh wool, and flax [and denim], and worketh willingly with her hands.
Nevermind me. I'm just sneaking in here to re-post my updated kitchen towel entry.
I first posted this tutorial on making a dressy oven door kitchen towel more than two years ago. Since then I have made many of them, and they just get easier! This is by far my most visited page, so I have updated the photos and added a video to demonstrate sewing the underarm seams. Yesterday I looked at Etsy.com to see what these towels are selling for. Wow! Some crafty ladies are asking $20 for them! I could do ten hours' work for $100... if they'd sell for that. Would you spend $20 for a kitchen towel??
These cute kitchen towels are relatively inexpensive gifts, especially if you have a stash of buttons and a bunch of extra trim lying around. And once you get the hang of it they don't take very long to whip up.
First of all, pick out a kitchen towel that you like, and find a coordinating fabric. You will need a piece about 14" x 28". Wash and dry your fabric. If it is a wrinkled mess, iron it. Fold your fabric in half, right sides together, so that when you cut out your pattern you will be cutting two identical pieces.
Here is the bodice pattern that I made. Sorry you can't read my notes very well. It is 12"x13", with the corners cut out so that the bodice is 8" across the front, and the sleeve side is 6" wide. You don't have to use these exact dimensions. I used a canning jar lid as a pattern for the head hole, and off-set the circle about 1/2" from the center so that the finished "dress" looks like there is a front and a back. (I did not offset the neck hole for the towel/dress in the above photo.)
Cut out your bodice through both layers, and remember to cut out the circle for a neck hole.
Next, cut your towel in half and set it aside. I found several of these nice quality Laura Ashley towels at Big!Lots! for $2.50 each.
Now take your bodice pieces and pin them together around the neck hole, matching all the sides and corners. Sew around the neck hole using a 1/4" seam.
Clip into the seam about every 1/2", or less, so that when you turn it right side out, the circle will be nice and even and not shaped like a multi-faceted polygon. Be careful not to cut into the stitching.
Take one of the layers, either one, and stuff it through the neck hole.
Now lay the two pieces together nice and flat, matching the sides, and press the neck seam.
The next part is easier to show than it is to explain. Watch.
Oops, I meant to say that the seam should be trimmed to 1/4" or 3/8". Be sure to clip into the curve, close to the stitching, just like you did with the neck seam. Lay the bodice flat and press each seam nice and flat.
Turn up a 5/8" hem on the sleeves, turning both the bodice piece and the lining piece to the inside of the fabric, matching the edges at the fold. Press, then top-stitch close to the edge.
Set the bodice aside.
Now for the towel/skirt. Using your longest stitch length (basting), make a row of stitching 5/8" from the cut edge of both towel pieces, leaving several inches of both spool and bobbin thread at both ends. Do this again 1/4" inside the first stitching line.
You are going to gather the towel so that its width will match the width of the bodice. Anchor the bobbin threads down at one end by inserting a pin and then wrapping both threads around the pin in a figure eight. At the other end of the stitching, pull both bobbin threads together with one hand, and with the other hand slide the fabric along the thread so that the towel edge gathers. When the towel width matches the bodice width, anchor this end of the thread the same way you did the other.
Adjust the gathers so that they are even across the top of the "skirt". Now pin the towel to the outside front piece of the bodice, right sides together, keeping the lining clear. Set your stitch length back to normal and sew from one side seam to the other, backstitching at each end. This is easier if you have the gathers on the underside. Repeat these steps with the back pieces.
Lay the "dress" out flat so the the inside is face up. Trim the seam to 3/8" (don't cut the facing) and press it towards the bodice. Your facing should be loose. Turn up the bottom edge of the facing 5/8" so that the pressed fold lies on the stitching line, and hand-sew it down across the bodice on the inside of the seam.
Here is how your "dress" should look now. Sorry, I got tricky and added some eyelet to the bodice/skirt seam, and I didn't tell you how to do that. But you can figure it out. I have confidence in you.
You're almost done! Now you can decorate with trim around the neck edge, sleeves, and/or bottom of bodice. Just stitch the trim on over the fabric, wrapping the trim ends around the back side.
The final step is to cut four pieces of 1/4" or 3/8" cross-grain ribbon to about 8", and tack one piece to each side of the front and back of the bodice. I use a bit of FrayCheck on the raw edges of the ribbon to keep it from raveling. Snaps would be good, too, or Velcro. Use your imagination.
Hang the dress over your oven door handle and tie both sides. Voila!